Как проверить автомобильные жидкости
Содержание
- Part 1 of 7: Consult your owner’s manual
- Part 2 of 7: Preliminary Setup
- Part 3 of 7: Check the engine oil
- Method 1: Use the Dipstick Method
- Method 2: Use the Instrument Cluster Method
- Part 4 of 7: Check the transmission fluid
- Part 5 of 7: Checking the brake fluid
- Part 6 of 7: Checking the power steering fluid
- Part 7 of 7: Checking windshield washer fluid
Being able to check the fluids in your car brings a sense of satisfaction and accomplishment as you are protecting your prized investment. By checking your fluids you are not only looking at fluid level but also fluid condition. This can help you predict possible issues that may be on the horizon and avoid costly repairs due to fluid neglect.
Part 1 of 7: Consult your owner’s manual
Your owner’s manual is going to be your roadmap to all of your fluid knowledge on your vehicle. Your owner’s manual will not only tell you what type and brand of fluid your manufacturer recommends, but will generally give you illustrations showing you where the various vehicle fluid reservoirs are located, since these can vary greatly between vehicles.
Шаг 1. Ознакомьтесь с руководством пользователя. The owner’s manual will give you illustrations and instructions regarding your fluids.
It will often tell you:
- How to read the various dipsticks and reservoir fill lines
- Типы жидкостей
- Locations of tanks and reservoirs
- Conditions for checking vital fluids
Part 2 of 7: Preliminary Setup
Шаг 1: Припаркуйтесь на ровной поверхности. To get accurate vehicle fluid level measurements, you need to ensure you have the vehicle parked on a safe and secure level surface.
Шаг 2: Включите стояночный тормоз. The parking brake should be engaged to prevent the vehicle from rolling and to keep you safe.
Step 3: Prepare your supplies. Have all of your supplies and tools clean and ready to go.
Clean rags, funnels, and catch pans are vital to reducing the amount of mess that can result from dripping fluids. Survey your area and always be as clean as possible when you work.
If you get foreign debris in your vehicle’s fluid, you may cause your vehicle expensive damage. As long as work consciously and smartly, you should have no issues.
- Функции: Keep your rags, tools, and work area clean to prevent contamination of fluids in your vehicle. Contamination can create unnecessary and costly repairs.
Step 4: Open your hood. You will need to open your hood and secure the hood from accidentally falling.
Make sure the prop rod, if equipped, is secure in locating holes. If your hood has struts, engage the safety locks, if equipped, to prevent accidental hood closure.
- Функции: A secondary hood prop is always a way to prevent accidental closure from wind or bumping.
Step 5: Review your owner’s manual. Lastly, review your owner’s manual and locate the various fluid fills and reservoirs to become more familiar with them.
All fluid reservoir caps should be clearly marked by the manufacturer.
Part 3 of 7: Check the engine oil
Engine oil is probably the most common fluid. There are two main methods used by automotive manufacturers to allow you to check the oil level. Remember, always refer to your owner’s manual for the proper procedure and operating conditions for checking your oil level.
Method 1: Use the Dipstick Method
Step 1: Remove the dipstick. Locate and remove the dipstick from under your hood.
Step 2: Clean off residual oil. Clean off any residual oil on the dipstick with a rag.
Step 3: Reinstall and remove the dipstick. Place the dipstick all the way into its bore until the stick bottoms out and remove the dipstick again.
Step 4: Examine the oil level. Over a rag, hold the stick in a horizontal position and look at the level of the oil line on the indicator section of the dipstick.
Your oil level should be between the upper and lower indicator line. A level below the lower line would indicate a level too low and more oil will need to be added. A level above both indicator lines means the oil level is too and some oil may need to be drained.
The oil on the dipstick should be examined for small particles or sludge. Evidence of either could indicate an engine problem or impending damage. If the oil level is low, have one of AvtoTachki’s mobile professionals come inspect it.
- Предупреждение: If you add oil, there should be an oil filler cap on the top of the engine; do not attempt to add oil through the dipstick tube.
Method 2: Use the Instrument Cluster Method
Some higher end vehicles and European cars do have an oil dipstick or do not require you to check the dipstick located in the engine compartment.
Step 1: Consult your owner’s manual. The owner’s manual will outline how to check the oil walk you through this type of check.
These oil level checks are generally dynamic and the engine will have to be running to conduct the check.
In most of these systems a heated oil level sensor will heat up to a target temperature above your actual oil temperature and then the instrument cluster will see how fast your oil level sensor cools down. The faster the sensor cools down the higher the oil level.
If your oil level sensor fails to cool to a target specification, then it will show a low oil level and submit a recommendation to add oil. While this method of oil level check is extremely accurate, it does not allow you to sample and check the oil condition. If your oil level is below normal, have a certified mechanic come inspect it.
Part 4 of 7: Check the transmission fluid
Checking the transmission fluid is becoming less and less necessary on newer cars. Most manufacturers are not even equipping their transmissions with dipsticks anymore and are filling them with a lifetime fluid that has no service life. However, there are still many vehicles out there on the road that have dipsticks and fluid that needs to be checked and changed at specific intervals.
Checking the transmission fluid level is similar to checking the oil level except the engine will generally be running at operating temperature and the transmission will be in park or neutral. Refer to the owner’s manual to duplicate the exact specified conditions.
Step 1: Remove the dipstick. Remove the dipstick and clean the excess fluid off of your dipstick with a clean rag.
Step 2: Reinstall the dipstick. Place the dipstick back into its bore completely.
Step 3: Remove the dipstick and check fluid level. Ensure the level is between the indicator lines.
A reading between the lines means the fluid level is correct. A reading below indicates more fluid needs to be added. Fluid above both fill marks indicates a fluid level too high and some fluid may need to be drained to get the fluid back to the correct level.
- Внимание: Fluid is generally added through the dipstick bore.
Step 4: Check the fluid condition. Examine your fluid to determine if it is not a normal color.
Fluid that is dark or smells burnt may need to be changed. Fluid with particles or a milky coloration indicates either damage or contamination of the fluid, and other repairs may be necessary.
If the fluid is either low or seems to be contaminated, have it serviced by one of AvtoTachki’s professional mechanics.
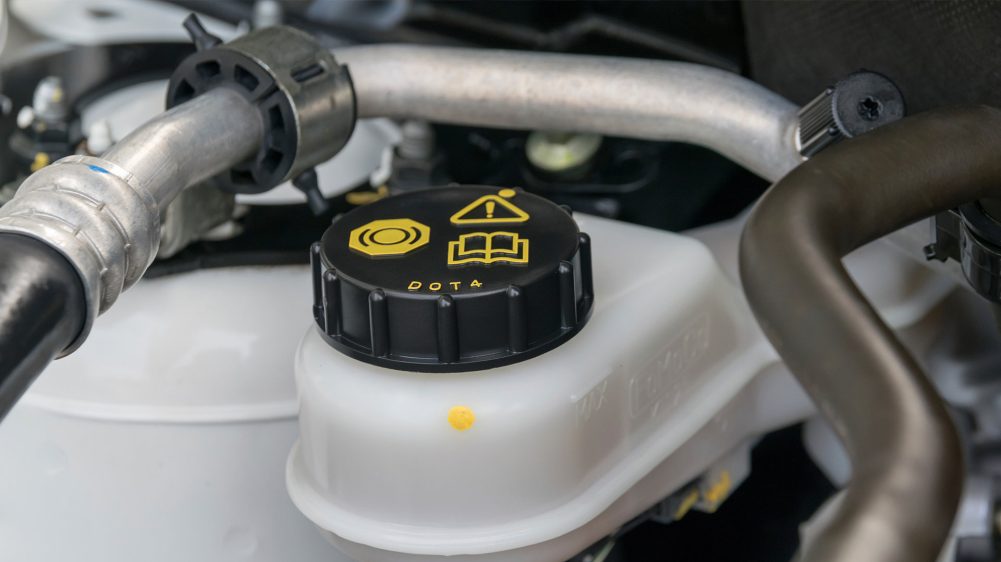
Part 5 of 7: Checking the brake fluid
Your vehicle should not losing or consuming brake fluid. If it is, then leaks must be corrected to prevent total brake failure. Brake fluid level will drop in the system as the brake linings wear. Topping off the fluid level each time the hood is opened will lead to an overfilled or overflowing reservoir when your brake linings are eventually replaced.
Шаг 1. Найдите бачок с тормозной жидкостью.. Use your owner’s manual to ensure you are looking in the correct location.
Step 2: Clean the reservoir. If you have a plastic reservoir, clean the exterior of the reservoir with a clean rag.
You should be able to see the maximum fill line. The fluid should be below this line but not too low to light the «Brake» indicator in your instrument cluster.
If you have an older vehicle with a cast iron reservoir integrated with the master cylinder, you will need to carefully remove the cover and inspect the fluid.
Step 3: Check the fluid condition. The fluid should be a light amber or blue (if DOT 5 fluid) and should not be dark in color.
Excessive darkness in color indicates fluid that has absorbed too much moisture. Fluid that has become saturated with moisture can no longer protect the metal surfaces on the brake system. If your brake fluid is contaminated, one of AvtoTachki’s professionals can diagnose the problem for you.
- Функции: Consult your owner’s manual for recommended service life of your brake fluid.
Part 6 of 7: Checking the power steering fluid
Checking the power steering fluid is vital to the steering system. Symptoms of low power steering fluid include groaning noises while turning and lack of steering assist. Most power steering systems are self-bleeding, meaning that if you add fluid all you have to do is start the engine and rotate the steering wheel back-and-forth, stop-to-stop to purge any air out.
The new trend is to have sealed systems that require no maintenance and are filled with a lifetime fluid. However, there are many cars out there that have systems that need to be checked and maintained. Be sure to refer to your owner’s manual to match the exact fluid in your system.
If you have a plastic reservoir, the process of checking your fluid will be different than checking it in a metal reservoir. Steps 1 and 2 will cover plastic reservoirs; steps 3 through 5 will cover metal reservoirs.
Step 1: Clean the reservoir. If you have a plastic reservoir, clean the outside of the reservoir with a clean rag.
You should see fill lines on the outside of the reservoir.
Шаг 2. Проверьте уровень жидкости. Ensure the fluid level is between the appropriate fill lines.
Step 3: Remove metal reservoir cap. Remove your reservoir cap, cleaning the excess fluid off of the dipstick with a clean rag.
Step 4: Place and remove the cap. Install your cap fully and remove it once more.
Шаг 5. Проверьте уровень жидкости. Read the level of the fluid on the dipstick and ensure the level falls within the full range.
If your power steering fluid needs service, have a mobile mechanic come and examine it for you.
- Внимание: Most power steering systems use one of two types of fluid: power steering fluid or ATF (Automatic Transmission Fluid). These fluids cannot be mixed in the same system or the power steering will not operate to maximum efficiency and damage can occur. Be sure to consult your owner’s manual and if you have any questions, Ask a Mechanic.
Part 7 of 7: Checking windshield washer fluid
Checking and topping off your windshield washer fluid is a simple procedure and one you will do often. There is no magic formula as to how slow or quickly you will consume your washer fluid so you need to be able to fill the reservoir a needed.
Step 1: Locate reservoir. Find the reservoir under your hood.
Be sure to consult your manual to find the exact symbol used to indicate the windshield washer fluid reservoir.
Step 2: Remove cap and fill the reservoir. You can use any product your manufacturer recommends and you will simply fill the reservoir to the top.
Step 3: Replace the cap to the reservoir. Make sure the cap is securely tightened.
Remember to review your owner’s manual and seek professional assistance from one of AvtoTachki’s service professionals if you are unsure of any of the fluid reservoir locations, fluids, or procedures. From oil changes to wiper blade replacements, their professionals can help keep your car’s fluids and systems in top shape.